Sometimes you only want one instance of a module created. We'll call this type of module a singleton module.
Sometimes you might want to be able to create multiple instances of a module. We'll just call this a multiple-instance module.
Take a look at the Pipeworks demo and note how the app uses the LoggerModule and PrattlerModule.
We see there is only one instance of LoggerModule for the whole app, but we can create many instances of the PrattlerModule.
First, here is the link to the Pipeworks source.
Below are the differences between singleton and multiple-instance modules:
LoggerModule - a singleton module
-LoggerModule constructor uses LoggerModule.NAME (static String) as LoggerModule.ApplicationFacade's multiton key
-LoggerModuleMediator uses LoggerModuleMediator.NAME (static String) as Shell.Mediator's name
-LoggerModuleMediator registered, pipes connected on application startup
PrattlerModule - a multiple-instance module
-PrattlerModule constructor uses PrattlerModule.moduleID (unique ID created from auto-incrementing static counter) as PrattlerModule.ApplicationFacade's multiton key
-PrattlerModuleMediator uses PrattlerModule.getID() as Shell.Mediator's name
-PrattlerModuleMediator registered using a command, pipes connected inside command.
Below are the pertinent functions PrattleModule used to generate and retrieve moduleID:
public function getID():String
{
return moduleID;
}
private static function getNextID():String
{
return NAME + '/' + serial++;
}
private static var serial:Number = 0;
private var moduleID:String = PrattlerModule.getNextID();
Thursday, June 26, 2008
Tuesday, June 24, 2008
How to Install CakeAMFPHP
Introduction
CAKEPHP
Are you trying to create an enterprise Flex app? You'll be needing to do some heavy lifting serverside. Chances are, you'll be needing some help... thats where CakePHP comes in. If you've programmed in PHP before, you've probably heard of CakePHP, a rapid development PHP framework. Using CakePHP allows us to stay MVC oriented, resulting in code with better readability and objects with looser coupling. Scalability. Baby!
AMFPHP
If you've ever tried to send data back and forth between flash and php chances are you've used AMFPHP. With AMFPHP you can do stuff like for example sending in custom value objects(public var fooGuy:UserVO) to your PHP script and back. This means less work, no converting objects to arrays and arrays back to objects.
CAKEAMFPHP
Wanna combine the best of both worlds? This is where CakeAMFPHP comes in. I'll be telling you have to install CakeAMFPHP with CakePHP 1.1 in this post.
Installation
Step 1.
Grab the latest CakePHP here: http://cakeforge.org/frs/download.php/591/cake_1.1.19.6305.tar.bz2
Step 2.
Extract this anywhere you'd like.
The directory structure should look like:
cake_1.1.19.6305/app
cake_1.1.19.6305/cake
cake_1.1.19.6305/docs
cake_1.1.19.6305/vendors
Step 3.
Grab the latest CakeAMFPHP here: http://cakeforge.org/frs/download.php/267/cakeamfphp.0.6.0.tar.bz2
Step 4.
Unzip CakeAMFPHP into a temporary directory.
The directory structure should look like:
cakeamfphp/webroot
cakeamfphp/views
cakeamfphp/vendors
Step 5.
Next cut and paste the webroot, views, and vendors directories into cakePHP's app folder (cake_1.1.19.6305/app). You are doing it right if cakeamfphp/webroot matches with cake_1.1.19.6305/app/webroot.
Step 6.
Configure your cakePHP installation (/app/config/core.php).
----------------------
the amfbrowser is located in the amfbrowser directory. If localhost points to your cakeAMFPHP project then http://localhost/amfbrowser will point you to the amfbrowser.
Now that the files are in place, take a look at amfBB for examples of how to use the cake_gateway.php to invoke cakePHP's controller methods.
You might notice that cakeAMFPHP break's cakePHP's session component. Next time, I'll teach you how to get cakePHP's sessions working with cakeAMFPHP :P
Monday, June 23, 2008
Getting into PureMVC Pipes
 Pipes is a utility written for PureMVC multi-core that allows application module communication and/or module module communication.
Before Pipes, communicating from application to module meant defining interfaces and directly accessing modules (through references). But in a PureMVC application implementing the Pipe utility, we communicate by sending 'messages' via the pipe system. A Message carries its type and also a payload object. Messages behave similarly to events in that the recipient of the message is not strongly tied to the sender of the message. The benefit should be clear that Pipes allows our application and modules to be further decoupled.
The Basics

The Pipes utility works off the plumbing metaphor. Take a toilet for example. A toilet has a pipe connecting to it that supplies water (input). There is also another pipe leaving the toilet that moves out waste (output). Please note that stuff in pipes are only intended to move in one direction. For example, you wouldn't want waste to come back from the sewers into your toilet! Yuck!
To hook up your application/module with pipes. You need to create whats called a Junction. A Junction is like a hole you just drilled into your app/module, now we can connect some pipes to it! In a PureMVC application, we use whats called a JunctionMediator. A JunctionMediator is just a Mediator that contains an instance of a Junction. It works just like any other mediator in that it can list and handle notification interests. Remember, you have to create a JunctionMediator for both application AND all of your modules.
With the Junction in place, we can now connect Pipes to it! A Pipe is the most basic element in this system. A Pipe's goal is simple, it passes stuff from one end(input) out through the other end (output).
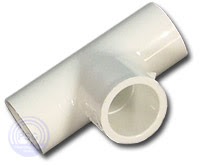
Plumbers call this a 'Tee'
Sometimes you need a pipe to 'split' to different destinations. For example, a main water pipe connects to your house. The pipe then splits off to your kitchen sink, bathroom sink, toilet, shower, garden hose, etc. To do this in our application, we use whats called a 'TeeSplit.' A TeeSplit sends a message from its input pipe down every output pipe that is connected to it. If you have an instance of TeeSplit and 3 Pipes and you do: Pipe1.connect(aTeeSplit), aTeeSplit.connect(Pipe2), and aTeeSplit.connect(Pipe3).
Stuff from Pipe1 flows into both Pipe2 and Pipe3.
Othertimes we need several pipes to 'merge' into one pipe. For example, there may be several toilets throughout the house, but all the waste pipes merge into one main waste pipe that leaves the house and flows to the local sewer system. To do this in our application, we use whats called a 'TeeMerge.' A TeeMerge will take messages sent from its input pipes and send it down its output pipe. If you have an instance of TeeMerge and 3 Pipes and you do: Pipe1.connect(aTeeMerge), aTeeMerge.connectInput(Pipe2), and aTeeMerge.connectInput(Pipe3). Stuff from both Pipe2 and Pipe3 flow into Pipe1.
Step 1: Making the Application Pipable
Create a JunctionMediator for your application
// ./mainapp/view/ApplicationJunctionMediator.as
public class ApplicationJunctionMediator extends JunctionMediator
{
  //Constructor, create a Junction instance
  public function ApplicationJunctionMediator()
  {
    super(NAME, new Junction());
  }

  //After the facade registers this mediator, lets attach some pipe fittings
  override public function onRegister():void {
    //Attach a TeeSplit to the junction for broadcasting messages
    junction.registerPipe('output', Junction.OUTPUT, new TeeSplit());

    //Attach a TeeMerge to the junction for receiving messages
    junction.registerPipe('input', Junction.INPUT, new TeeMerge());

    //Add a listener, to listen for messages entering the Junction
    junction.addPipeListener('input', this, handlePipeMessage);

    //give the application junction to mymodulemediator so we can connect the pipes
    sendNotification(ApplicationFacade.CONNECT_APP_TO_MYMODULE, junction );
  }

  //this function handles any messages the Junction recieves
  override public function handlePipeMessage( message:IPipeMessage ):void
  {
     trace('App got message: ', message.message);
  }


}
Step 2: Making a Module Pipable
Create a JunctionMediator for your module
// ./mymodule/view/MyModuleJunctionMediator.as
public class MyModuleJunctionMediator extends JunctionMediator
{
  //Constructor, create a Junction instance
  public function MyModuleJunctionMediator()
  {
    super(NAME, new Junction());
  }

  //After the facade registers this mediator, lets attach some pipe fittings
  override public function onRegister():void {
    //Add a listener, to listen for messages entering the Junction
    junction.addPipeListener('input', this, handlePipeMessage);
  }

  //this function handles any messages the Junction recieves
  override public function handlePipeMessage( message:IPipeMessage ):void
  {
     trace('MyModule got message: ', message.message);
  }

}
Step 3: Creating the Module and Connecting the Pipes
To use a module in your application, you need to create a mediator that instantiates and holds an instance of that module. This mediator is also responsible for connecting the Pipes after the application and module have finished instantiating.
// ./mainapp/view/MyModuleMediator.as
public class MyModuleMediator extends Mediator
{
    //Constructor, create a instance of MyModule
    public function MyModuleMediator()
    {
     super(NAME, new MyModule());
    }

    override public function handleNotification( note:INotification ):void
    {
        switch( note.getName() )
        {
            case  ApplicationFacade.CONNECT_APP_TO_MYMODULE:

                // The junction was passed from ApplicationJunctionMediator
                var junction:Junction = note.getBody() as Junction;

                // Connect the apps's teesplit(output) to mymodule's junction
                var ateesplit:TeeSplit = junction.retrievePipe('output') as TeeSplit;
                var apipe:IPipeFitting = new Pipe();
                ateesplit.connect(apipe);
                mymodule.acceptInputPipe('input', apipe);

                // Connect a new output pipe from mymodule's junction to app's teemerge
                var mymoduleToApp:Pipe = new Pipe();
                var ateemerge:TeeMerge = junction.retrievePipe('input') as TeeMerge;
                ateemerge.connectInput(mymoduleToApp);
                mymodule.acceptOutputPipe('output', mymoduleToApp);

            break;
        }
    }
    private function get mymodule:MyModule { return viewComponent as MyModule; }

}
Step 4: Sending a Message down the Pipes
To send a Message down the pipes, you use the Junction's sendMessage function.
For example, if I wanted to send a message from the application to MyModule. I would in ApplicationJunctionMediator, do:
junction.sendMessage('output', new Message(Message.NORMAL, null, 'hellofromapp'));
MyModuleJunctionMediator would get the message, and its method handlePipeMessage invoked would be invoked. The result should be a trace 'MyModule got message: hellofromapp'.
In this example, the message payload was only a String. If you want you can pass any object as the payload.
More Resources
This was a very basic explaination of Pipes. Pipes also has filtering and queueing features which I won't discuss here. For more information please take a look at the following:
Nice tutorial on Pipes: http://www.joshuaostrom.com/2008/06/15/understanding-puremvc-pipes/
Take a look at Pipe's unit tests to get a better understanding of what each class is trying to accomplish:
http://trac.puremvc.org/Utility_AS3_MultiCore_Pipes_UnitTests
Check out Pipeworks example's source code to see Pipes in action:
http://trac.puremvc.org/Demo_AS3_MultiCore_Flex_PipeWorks
Subscribe to:
Posts (Atom)