Reasons to use PureMVC over Cairngorm.
#1 IMO if your gonna use Cairngorm your better off just going ahead and skipping every framework concept and just making classes with static (global) variables. That's what it feels like to me anyway lol.
#2 Makes it too easy for you to be sloppy. Accessing your model locator everywhere in your app can get ugly fast. PureMVC has a very structured but flexible way to code. Once you get comfortable with PureMVC, you will be able to get up to speed in other projects coded with PureMVC much quicker than Cairngorm coded projects.
#3 If your just starting to try to learn Cairngorm and find it confusing, it's cause you can't make sense of something that doesn't make sense!
#4 It's difficult to make a modular program in Cairngorm. Since the controller/models are singletons only one instance can exist (thus only one instance of the application). There are ways to get it to work, but you're gonna have to think outside the box for that..
PureMVC Multicore provides a framework for creating modular applications right out of the box.
#5 PureMVC utilities. The PureMVC community has added more capabilities on top of the PureMVC framework such as Undo/Redo (works great BTW), Pipes, etc.
#6 Scalability. It just gets way too messy trying to make a complex Cairngorm application. It can especially happen if you're just beginning at it or have been coding lazily. Because coding in PureMVC is much more structured, you won't be held back in the late game.
#7 PureMVC is fun to program in. Cairngorm is a nightmare :P
#8 Views can actually be reused in PureMVC. It's hard to do this in Cairngorm with all the views accessing directly to the global variables in the models. The reason PureMVC can decouple the view from the model is it has something called Mediators which take care of displaying and interaction in the views.
#9 Cairngorm is Adobe's official framework, and Adobe has been pissing me off lately with all the bugs I keep running into :P
p.s. Sorry for the long rant :P
Showing posts with label PureMVC. Show all posts
Showing posts with label PureMVC. Show all posts
Monday, May 11, 2009

Friday, July 11, 2008
PureMVC Pipes disconnecting the pipes after a module is unloaded TeeSplit
because TeeSplit can't remove a pipefitting of our choosing I extended it
and added in this method:
in a PipeAwareModule you can add a reference to the pipes connecting to it.
if your module has a unload method you'd want to:
1] call facade.removeMediator on every mediator (in the junction mediator's onRemove method do junction.removePipe on all pipefittings attached to that junction), facade.removeProxy, ..etc
2] call the removepipes() to remove incoming pipes, then
3] call facade.removeCore to get rid of all the core actors.
and added in this method:
        public function removePipeFitting(inpipe:IPipeFitting):IPipeFitting {
         var outputsac:ArrayCollection = new ArrayCollection(outputs);

         if (outputsac.getItemIndex(inpipe) >= 0) {
          return outputsac.removeItemAt(outputsac.getItemIndex(inpipe)) as IPipeFitting;
         }
         return null;

        }
in a PipeAwareModule you can add a reference to the pipes connecting to it.
  private var _cachedPipes:ArrayCollection = new ArrayCollection([]);


  /**
   * used to remove pipes at the shell's side of the junction
   *
   * @param pipefitting we are going to call disconnect on this pipefitting
   * @param output
   *
   */
  public function cacheFitting(pipefitting:IPipeFitting, output:IPipeFitting):void {
   _cachedPipes.addItem({pipefitting:pipefitting, output:output});
  }

  /**
   * goes through the arraycollection disconnecting the pipefitting from output
   *
   */
  public function removepipes():void {
   for each (var pipefittings:Object in _cachedPipes) {
    if (pipefittings.pipefitting is TeeSplitImproved) {
     (pipefittings.pipefitting as TeeSplitImproved).removePipeFitting(pipefittings.output);
    }
    else {
     (pipefittings.pipefitting as IPipeFitting).disconnect();
    }
   }
   _cachedPipes.removeAll();
  }
if your module has a unload method you'd want to:
1] call facade.removeMediator on every mediator (in the junction mediator's onRemove method do junction.removePipe on all pipefittings attached to that junction), facade.removeProxy, ..etc
2] call the removepipes() to remove incoming pipes, then
3] call facade.removeCore to get rid of all the core actors.
PureMVC Pipes Connecting / Disconnecting Pipes TeeMerge
===pipe1========= teemerge ---------------
                     |
======pipe2==========|
To get something like above you could either do
pipe1.connect(teemerge);
pipe2.connect(teemerge);
OR equivalently
teemerge.connectInput(pipe1);
teemerge.connectInput(pipe2);
disconnecting pipes
lets say we had:
======pipe1========pipe2==========pipe3=========

doing:
pipe1.disconnect().disconnect().disconnect();


would result in:


=====pipe1        pipe          pipe3

because each disconnect returns the disconnected pipe
===teesplit==============pipe1=====
              |
              |==========pipe2=====
              |
              |==========pipe3=====


in this case

teesplit.disconnect();
teesplit.disconnect();
teesplit.disconnect();

removes all 3 pipes in the reverse order that you connected them.


there is no built in capability to remove a pipe of your choosing at the moment(something you need if your gonna be doing a lot of module building!!).

check here to see how someone implemented it themself:
http://forums.puremvc.org/index.php?action=printpage;topic=508.0
Thursday, July 10, 2008
PureMVC Pipes - using the filter
The filter is useful for filtering the messages going through the pipes. An analogy you can use is a water filter.
in code form this would look like this:
the way something gets filtered is this..
1] the message going through the filter must have a variable in the message header,
lets call it particleSize:int.
example:
2] the filter also needs a paramater to compare wether to let the message through or not, lets call it maxParticleSize.
3] then the filter needs a filter function which checks if the maxParticleSize >= particleSize.
How to setup the filter
to make it do something we have to create the filter and pass in parameters to the constructor.
One way to create the filter is to pass in all name, output, filter and params to the functions parameters:
above, messages enter input the teeMerge, then goes to the filter, if the filter
accepts the message, it sends it to the pipelistener.
If you look at the Filter constructor you can see output, filter and params are optional and can be set/modified after creation of the filter which I will explain how that works below.
setting the output
setting the log level/filter function
If you look at Filter's source, its write method is where the filter changes it's log level and filter function. When the filter sees a FilterControlMessage.SET_PARAMS it will then try to set the new params.
below I set the maxParticleSize to 10 because i want the mineral to go through:
of course, you can send the FilterControlMessage through a modules junction to the
filter using junction.sendMessage as well.
wall ======== [water filter] ========= fridge/sink
       pipe1                    pipe2
in code form this would look like this:
              // create output pipes 1
               var pipe1:IPipeFitting = new Pipe();
               var pipe2:IPipeFitting = new Pipe();

              // create filter
               var filter:Filter = new Filter( 'TestFilter' );

               // connect input fitting
               var connectedInput:Boolean     = pipe1.connect( filter );

               // connect output fitting
               var connectedOutput:Boolean = filter.connect( pipe2 );
the way something gets filtered is this..
1] the message going through the filter must have a variable in the message header,
lets call it particleSize:int.
example:
 var h20Message:IPipeMessage = new Message( Message.NORMAL, { particleSize:1, name:'h20'} );
 var mineralMessage:IPipeMessage = new Message( Message.NORMAL, { particleSize:10, name:'mineral'} );
2] the filter also needs a paramater to compare wether to let the message through or not, lets call it maxParticleSize.
3] then the filter needs a filter function which checks if the maxParticleSize >= particleSize.
How to setup the filter
to make it do something we have to create the filter and pass in parameters to the constructor.
        /**
         * Constructor.
         *
         * Optionally connect the output and set the parameters.
         */
        public function Filter( name:String, output:IPipeFitting=null, filter:Function=null, params:Object=null )
        {
            super( output );
            this.name = name;
            if ( filter != null ) setFilter( filter );
            if ( params != null ) setParams( params );
        }
One way to create the filter is to pass in all name, output, filter and params to the functions parameters:
var teeMerge:TeeMerge = new TeeMerge();
var filter:Filter = new Filter( 'waterFilter',
                                new PipeListener(this,function ( message:IPipeMessage ){trace('particle got through');),
                                function( message:IPipeMessage, params:Object ):void { if (message.getHeader().particleSize >= params.maxParticleSize) throw new Error('particle filtered'); },
                                { maxParticleSize:5 }
                              );
teeMerge.connect(filter);
junction.registerPipe( PipeAwareModule.STDIN, Junction.INPUT, teeMerge );
above, messages enter input the teeMerge, then goes to the filter, if the filter
accepts the message, it sends it to the pipelistener.
If you look at the Filter constructor you can see output, filter and params are optional and can be set/modified after creation of the filter which I will explain how that works below.
setting the output
filter.connect(a IPipeFitting)setting the log level/filter function
If you look at Filter's source, its write method is where the filter changes it's log level and filter function. When the filter sees a FilterControlMessage.SET_PARAMS it will then try to set the new params.
below I set the maxParticleSize to 10 because i want the mineral to go through:
var maxParticleSize:number = 10;
var setLogLevelMessage:LogFilterMessage = new LogFilterMessage(FilterControlMessage.SET_PARAMS, particleSize);
filter.write(setLogLevelMessage );
of course, you can send the FilterControlMessage through a modules junction to the
filter using junction.sendMessage as well.
Thursday, June 26, 2008
PureMVC Pipeworks Singleton vs Multiple-Instance Modules
Sometimes you only want one instance of a module created. We'll call this type of module a singleton module.
Sometimes you might want to be able to create multiple instances of a module. We'll just call this a multiple-instance module.
Take a look at the Pipeworks demo and note how the app uses the LoggerModule and PrattlerModule.
We see there is only one instance of LoggerModule for the whole app, but we can create many instances of the PrattlerModule.
First, here is the link to the Pipeworks source.
Below are the differences between singleton and multiple-instance modules:
LoggerModule - a singleton module
-LoggerModule constructor uses LoggerModule.NAME (static String) as LoggerModule.ApplicationFacade's multiton key
-LoggerModuleMediator uses LoggerModuleMediator.NAME (static String) as Shell.Mediator's name
-LoggerModuleMediator registered, pipes connected on application startup
PrattlerModule - a multiple-instance module
-PrattlerModule constructor uses PrattlerModule.moduleID (unique ID created from auto-incrementing static counter) as PrattlerModule.ApplicationFacade's multiton key
-PrattlerModuleMediator uses PrattlerModule.getID() as Shell.Mediator's name
-PrattlerModuleMediator registered using a command, pipes connected inside command.
Below are the pertinent functions PrattleModule used to generate and retrieve moduleID:
public function getID():String
{
return moduleID;
}
private static function getNextID():String
{
return NAME + '/' + serial++;
}
private static var serial:Number = 0;
private var moduleID:String = PrattlerModule.getNextID();
Sometimes you might want to be able to create multiple instances of a module. We'll just call this a multiple-instance module.
Take a look at the Pipeworks demo and note how the app uses the LoggerModule and PrattlerModule.
We see there is only one instance of LoggerModule for the whole app, but we can create many instances of the PrattlerModule.
First, here is the link to the Pipeworks source.
Below are the differences between singleton and multiple-instance modules:
LoggerModule - a singleton module
-LoggerModule constructor uses LoggerModule.NAME (static String) as LoggerModule.ApplicationFacade's multiton key
-LoggerModuleMediator uses LoggerModuleMediator.NAME (static String) as Shell.Mediator's name
-LoggerModuleMediator registered, pipes connected on application startup
PrattlerModule - a multiple-instance module
-PrattlerModule constructor uses PrattlerModule.moduleID (unique ID created from auto-incrementing static counter) as PrattlerModule.ApplicationFacade's multiton key
-PrattlerModuleMediator uses PrattlerModule.getID() as Shell.Mediator's name
-PrattlerModuleMediator registered using a command, pipes connected inside command.
Below are the pertinent functions PrattleModule used to generate and retrieve moduleID:
public function getID():String
{
return moduleID;
}
private static function getNextID():String
{
return NAME + '/' + serial++;
}
private static var serial:Number = 0;
private var moduleID:String = PrattlerModule.getNextID();
Monday, June 23, 2008
Getting into PureMVC Pipes
 Pipes is a utility written for PureMVC multi-core that allows application module communication and/or module module communication.
Before Pipes, communicating from application to module meant defining interfaces and directly accessing modules (through references). But in a PureMVC application implementing the Pipe utility, we communicate by sending 'messages' via the pipe system. A Message carries its type and also a payload object. Messages behave similarly to events in that the recipient of the message is not strongly tied to the sender of the message. The benefit should be clear that Pipes allows our application and modules to be further decoupled.
The Basics

The Pipes utility works off the plumbing metaphor. Take a toilet for example. A toilet has a pipe connecting to it that supplies water (input). There is also another pipe leaving the toilet that moves out waste (output). Please note that stuff in pipes are only intended to move in one direction. For example, you wouldn't want waste to come back from the sewers into your toilet! Yuck!
To hook up your application/module with pipes. You need to create whats called a Junction. A Junction is like a hole you just drilled into your app/module, now we can connect some pipes to it! In a PureMVC application, we use whats called a JunctionMediator. A JunctionMediator is just a Mediator that contains an instance of a Junction. It works just like any other mediator in that it can list and handle notification interests. Remember, you have to create a JunctionMediator for both application AND all of your modules.
With the Junction in place, we can now connect Pipes to it! A Pipe is the most basic element in this system. A Pipe's goal is simple, it passes stuff from one end(input) out through the other end (output).
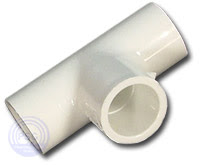
Plumbers call this a 'Tee'
Sometimes you need a pipe to 'split' to different destinations. For example, a main water pipe connects to your house. The pipe then splits off to your kitchen sink, bathroom sink, toilet, shower, garden hose, etc. To do this in our application, we use whats called a 'TeeSplit.' A TeeSplit sends a message from its input pipe down every output pipe that is connected to it. If you have an instance of TeeSplit and 3 Pipes and you do: Pipe1.connect(aTeeSplit), aTeeSplit.connect(Pipe2), and aTeeSplit.connect(Pipe3).
Stuff from Pipe1 flows into both Pipe2 and Pipe3.
Othertimes we need several pipes to 'merge' into one pipe. For example, there may be several toilets throughout the house, but all the waste pipes merge into one main waste pipe that leaves the house and flows to the local sewer system. To do this in our application, we use whats called a 'TeeMerge.' A TeeMerge will take messages sent from its input pipes and send it down its output pipe. If you have an instance of TeeMerge and 3 Pipes and you do: Pipe1.connect(aTeeMerge), aTeeMerge.connectInput(Pipe2), and aTeeMerge.connectInput(Pipe3). Stuff from both Pipe2 and Pipe3 flow into Pipe1.
Step 1: Making the Application Pipable
Create a JunctionMediator for your application
// ./mainapp/view/ApplicationJunctionMediator.as
public class ApplicationJunctionMediator extends JunctionMediator
{
  //Constructor, create a Junction instance
  public function ApplicationJunctionMediator()
  {
    super(NAME, new Junction());
  }

  //After the facade registers this mediator, lets attach some pipe fittings
  override public function onRegister():void {
    //Attach a TeeSplit to the junction for broadcasting messages
    junction.registerPipe('output', Junction.OUTPUT, new TeeSplit());

    //Attach a TeeMerge to the junction for receiving messages
    junction.registerPipe('input', Junction.INPUT, new TeeMerge());

    //Add a listener, to listen for messages entering the Junction
    junction.addPipeListener('input', this, handlePipeMessage);

    //give the application junction to mymodulemediator so we can connect the pipes
    sendNotification(ApplicationFacade.CONNECT_APP_TO_MYMODULE, junction );
  }

  //this function handles any messages the Junction recieves
  override public function handlePipeMessage( message:IPipeMessage ):void
  {
     trace('App got message: ', message.message);
  }


}
Step 2: Making a Module Pipable
Create a JunctionMediator for your module
// ./mymodule/view/MyModuleJunctionMediator.as
public class MyModuleJunctionMediator extends JunctionMediator
{
  //Constructor, create a Junction instance
  public function MyModuleJunctionMediator()
  {
    super(NAME, new Junction());
  }

  //After the facade registers this mediator, lets attach some pipe fittings
  override public function onRegister():void {
    //Add a listener, to listen for messages entering the Junction
    junction.addPipeListener('input', this, handlePipeMessage);
  }

  //this function handles any messages the Junction recieves
  override public function handlePipeMessage( message:IPipeMessage ):void
  {
     trace('MyModule got message: ', message.message);
  }

}
Step 3: Creating the Module and Connecting the Pipes
To use a module in your application, you need to create a mediator that instantiates and holds an instance of that module. This mediator is also responsible for connecting the Pipes after the application and module have finished instantiating.
// ./mainapp/view/MyModuleMediator.as
public class MyModuleMediator extends Mediator
{
    //Constructor, create a instance of MyModule
    public function MyModuleMediator()
    {
     super(NAME, new MyModule());
    }

    override public function handleNotification( note:INotification ):void
    {
        switch( note.getName() )
        {
            case  ApplicationFacade.CONNECT_APP_TO_MYMODULE:

                // The junction was passed from ApplicationJunctionMediator
                var junction:Junction = note.getBody() as Junction;

                // Connect the apps's teesplit(output) to mymodule's junction
                var ateesplit:TeeSplit = junction.retrievePipe('output') as TeeSplit;
                var apipe:IPipeFitting = new Pipe();
                ateesplit.connect(apipe);
                mymodule.acceptInputPipe('input', apipe);

                // Connect a new output pipe from mymodule's junction to app's teemerge
                var mymoduleToApp:Pipe = new Pipe();
                var ateemerge:TeeMerge = junction.retrievePipe('input') as TeeMerge;
                ateemerge.connectInput(mymoduleToApp);
                mymodule.acceptOutputPipe('output', mymoduleToApp);

            break;
        }
    }
    private function get mymodule:MyModule { return viewComponent as MyModule; }

}
Step 4: Sending a Message down the Pipes
To send a Message down the pipes, you use the Junction's sendMessage function.
For example, if I wanted to send a message from the application to MyModule. I would in ApplicationJunctionMediator, do:
junction.sendMessage('output', new Message(Message.NORMAL, null, 'hellofromapp'));
MyModuleJunctionMediator would get the message, and its method handlePipeMessage invoked would be invoked. The result should be a trace 'MyModule got message: hellofromapp'.
In this example, the message payload was only a String. If you want you can pass any object as the payload.
More Resources
This was a very basic explaination of Pipes. Pipes also has filtering and queueing features which I won't discuss here. For more information please take a look at the following:
Nice tutorial on Pipes: http://www.joshuaostrom.com/2008/06/15/understanding-puremvc-pipes/
Take a look at Pipe's unit tests to get a better understanding of what each class is trying to accomplish:
http://trac.puremvc.org/Utility_AS3_MultiCore_Pipes_UnitTests
Check out Pipeworks example's source code to see Pipes in action:
http://trac.puremvc.org/Demo_AS3_MultiCore_Flex_PipeWorks
Subscribe to:
Posts (Atom)